DIY Easy Succulent Terrarium

If you have ever wanted a pretty houseplant with very little upkeep then get your gardening gloves ready!  I am going to walk you through how to make a simple terrarium that will look gorgeous and require almost no maintenance at all.  This quick and easy terrarium should not cost you very much to put together, but you’ll want to make it outside as it can be quite messy!


Materials needed:

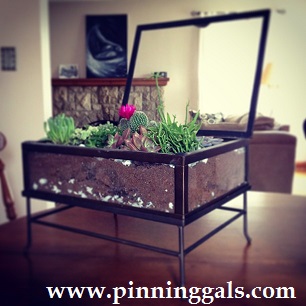
  • A glass container (fishbowl, punch bowl) or a large pot – free if you find something at home to use

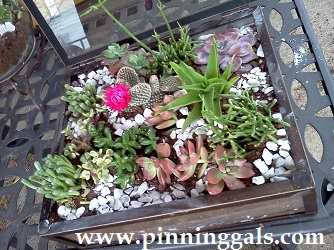
  • rocks (I used white marble rocks for contrast) – around $5 for a bag

  • moss (I bought a brick of it, just add water) – around $4

  • soil – around $5 for a bag

  • variety of succulents – between $3 – $5 per plant (I used 11 plants for what I would consider a pretty large terrarium

Steps:

  • Find a suitable container – almost anything can be used!  This is your chance to be creative and repurpose something lying around your house.  My container was salvaged from a bunch of items that were going to be thrown away.

  • Add a layer of rocks to the bottom of your container.

  • Next will be the layer of moss.  I bought a brick of moss from the local greenhouse.  You add water to the brick and it expands to 12x it’s size!  The layer of moss helps to retain water which will keep your plants hydrated with very little attention from you!

  • Add a thick layer of soil.  I used a Miracle Grow bag which was especially for starting out new plants and promoting healthy root growth however you can use any kind.  A lot of people recommend using a dry “sand” type of soil.

  • Arrange your plants in a way that pleases your eye!  Let your inner garden-artist shine.

  • Push your plants into the soil and then add more soil on top and around the plants to secure them.

  • Anchor your plants in the container by placing more rocks on top – this also adds to the overall visual beauty of your new masterpiece.

Maintenance:

Mist every once in awhile with water from a spray bottle. The soil needs to stay dry and the moss at the bottom of your container will retain moisture to keep the plants hydrated. The plants need light however they do not have to be in direct sunlight, these can be kept anywhere in your house that has indirect sunlight.

Enjoy nature’s beauty!

I’m no Cake Boss or Ace of Cakes.

Cake decorating is something I only do once in a while and only on very special occasions for people who are dear to me. Those of you who have ever decorated a cake may relate to why this is. For myself it usually involves countless hours of baking, icing, putting on the fondant, making the decorations for the cake and applying the finishing touches.

Although I’m no Cake Boss or Ace of Cakes, the smile on the face of the person/people when they see their cakes for the first time sure make me feel like I am!

Here are a few cakes I have made over the last couple of years.

Super Mario: I made this for my boys 4th birthday. Completely edible except for the Mario and Luigi figurines. The green tube i made out of an ice-cream cone, covered in green fondant and black icing in the middle of it.

mario cake

Bugs: Both my boys are fascinated with bugs so made this for their 5th Birthday. Bugs are edible made and shaped out of Rice Krispies then covered in fondant.

bug cale

Monsters: Monster splash was the theme for my boys 6th birthday. You can find more ideas for that theme here.

Monster Cake

Disney Princess: Made for my nieces Disney Princess themed 2nd birthday. All edible except the Disney Princess figurines.

Princess Cake

Toilet Cake: Saved the best one for last:) Made on request for my good friends husbands 40th. Everything is edible except the board it is sitting on, and yes even the poo!

toilet cake

DIY Bedroom Wall Collage Using Upcycled Frames.

Over the past while I have been drooling admiring, the many different wall collage ideas I have seen on Pinterest. In the past two weeks I managed to get Pinspired and do a wall collage for our master bedroom wall upcycling old picture frames. It is not complete but close. Id like to add a few more things to it, filling in some gaps.  Will update with the finished project with the master bedroom makeover reveal.

wall collage good

Apologies for the poor photo qualities, investing in a good camera is on the top of my to do list!

Project info:

Frames – $15.00 purchased  from second hand/thrift stores and spray painted them all with spray paint purchased from Michales.

Spray paint (black and silver) $7.00 used 50 percent off one item coupons at Michaels

You and me lettering and ampersand sign  $7.00 from Walmart

Laugh, Dream, Letter P and letter B sign – $8.00 using 50 percent off one item at Michaels coupons

Love sign $1.00 from Dollar store at valentines was red spray painted it black.

Scrap book paper I had from a booklet of them from Michaels $ .50

Total project cost = $38.50

.wallcollage me